Installation Manual
- Install this product in a well-ventilated place away from direct sunlight, preferably under a cover.
- Install the air pump in a place that provides easy access for inspection and maintenance.
- Place this product level on a stable surface.
- Connect this product and the pipe by a rubber tube and tighten by a pinchcock.
- Ensure the voltage shown on the label correlates with the mains supply voltage.
WARNING
- All electrical work must be performed by a licensed electrician.
- Do not place any object on the power cord. Doing so may cause electric shock and/or fire.
CAUTION
- The diaphragms and valve will be damaged by chlorine gas and other fumes. Any hole or gap (such as conduit or air pipe) where chlorine gas could pass through to this product must be sealed completely with silicon sealant or other suitable material. (Diaphragm and valve damage is not covered by the warranty.)
- To prevent this product from falling into the water tank, do not install this product directly above the water tank.
- Make sure this product is used in a dry, moisture and dust-free place protected from rain, splashing water, flooding, and snow accumulation.
- Do not install this product under a kitchen fan or where air that includes oil can be taken into this product.
- Avoid installing this product in a bedroom or other places where noises may be a nuisance.
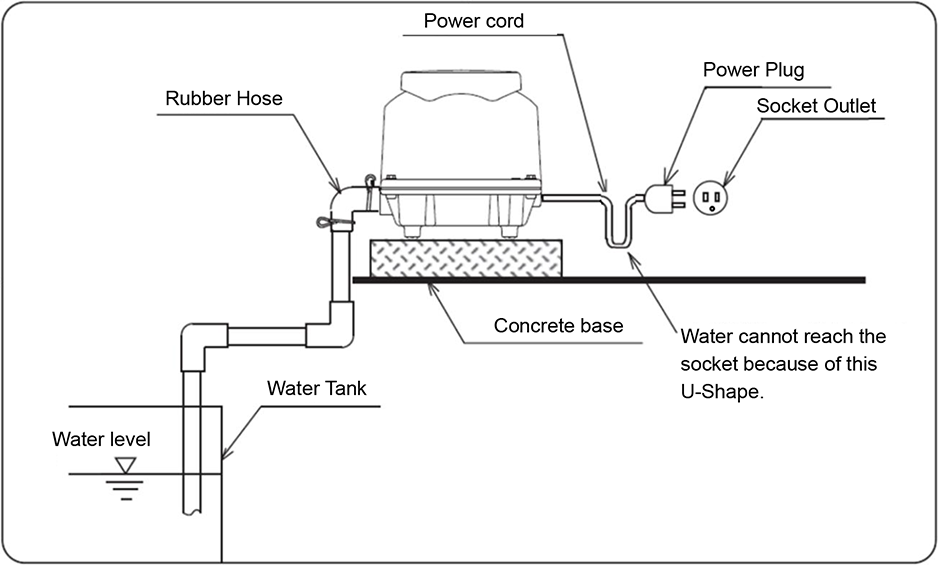
- Install this product above the water level so that water does not flow back by siphoning.
- Ensure that water cannot reach the socket. (Refer to Example of Suggested Installation.)
- This product must be connected to a grounded, metallic, permanent wiring system or an equipment-grounding terminal or lead on the product.
- Be sure to conduct grounding construction work. (Applicable only for 2-pin plugs.)
Grounding instruction (For 2-pin plugs)
Grounding must be done to avoid the risk of electric shock.
- Use a grounding wire with a thickness of AWG16 or more.
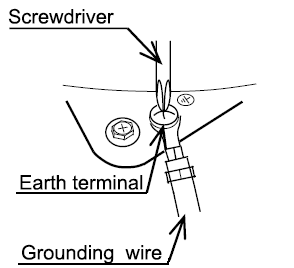
- Remove the grounding screw from this product’s cover.
- Connect the grounding wire to this product’s cover using the grounding screw and a screwdriver.
- Make sure the grounding screw is securely tightened and does not move.
- The grounding wire must be connected to a grounding rod by a qualified electrician.
*Do not connect it to anything flammable such as a gas pipe.
WARNING
- Improper grounding may cause electric shock and/or fire.
Grounding instruction (For North America)
This product must be grounded. In the event of an electrical short circuit, grounding reduces the risk of electric shock by providing an escape wire for the electric current. This product is equipped with a cord having a grounding wire with an appropriate grounding plug. The plug must be plugged into an outlet that is properly installed and grounded in accordance with all local codes and ordinances.
WARNING
- Improper installation of the grounding plug is able to result in a risk of electric shock. When repair or replacement of the cord or plug is required, do not connect the grounding wire to either flat blade terminal. The wire with insulation having an outer surface that is green with or without yellow stripes is the grounding wire.
- Substitution of the signal word “DANGER” for “WARNING” is not prohibited when the risk associated with the product is such that a situation exists which if not avoided will result in death or serious injury.
- Check with a qualified electrician or serviceman when the grounding instructions are not completely understood, or when in doubt as to whether the product is properly grounded. Do not modify the plug provided; if it does not fit the outlet, have the proper outlet installed by a qualified electrician.
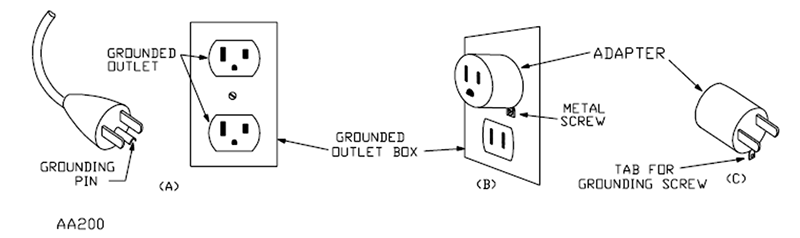
- This product is for use on a nominal 120-V circuit, and has a grounding plug similar to the plug illustrated in sketch A in Figure 1. A temporary adapter similar to the adapter illustrated in sketches B and C may be used to connect this plug to a 2-pole receptacle as shown in sketch B when a properly grounded outlet is not available. The temporary adapter shall be used only until a properly grounded outlet (sketch A) is installed by a qualified electrician. The green colored rigid ear, lug, or similar part extending from the adapter must be connected to a permanent ground such as a properly grounded outlet box cover. Whenever the adapter is used, it must be held in place by a metal screw.
Figure 1 Grounding Method
Extension Cords (For North America)
Use only a 3-wire extension cord that has a 3-blade grounding plug, and a 3-slot receptacle that accepts the plug on the product. Make sure your extension cord is not damaged. When using an extension cord, be sure to use one heavy enough to carry the current your product draws. For lengths less than 50ft, 18AWG extension cords shall be used. An undersized cord results in a drop in line voltage and loss of power and overheating. (NOTE: Table 1 shows the correct size to use depending on cord length and nameplate ampere rating. When in doubt, use the next heavier gauge. The smaller the gauge number, the heavier the cord.)
Table 1 Minimum Gauge for Extension Cord
*Horizontal scrolling of the table is possible on a smartphone.
|
Cord length(ft) |
25 |
50 |
100 |
150 |
200 |
250 |
300 |
400 |
500 |
|
AWG |
18 |
18 |
16 |
14 |
12 |
12 |
10 |
10 |
8 |
Example of Suggested Installation